


Wondering what's the best way to grow a magic bean plant?
Don't worry, we've got your back. You will find below our 8 best tips, garnered from years of artisan bean farming. So follow this guide and you'll be on the way to being a true magic bean ninja!
1. Don't grow the magic bean upside down.
It sounds obvious, but it's not.
Your bean has a small dark brownish (even black) oval shaped mark on one side. This is called the Hilum or "eye of the bean" and it must face DOWN. That's important because the roots of the plant are going to shoot out of that thing.

If you bury him with the Hilum facing upwards, your bean will feel somewhat like a poor up-ended horseshoe crab and may never see the light of day (you try getting out of bed while standing on your head).
2. Don't plant them too deep
You only need to bury your beans 2-3mm under the surface. While they will still grow if you plant them as deep as 2-3cm, the deeper you plant them, the longer your magic beans will take to see the light of day. And we're guessing you'd like to experience your message bursting forth from the soil sooner rather than later.
Some people take this to its logical extreme and simply push their magic beans slightly into the surface of the soil - so that they are surrounded by, but not submerged or covered by, the growing medium.
This has the benefit that you get to see the process of your magic beans swelling up and sprouting first hand. This is however a much riskier approach and has an increased chance of something going haywire (such as the beans drying out or not being able to establish a root system). We recommend actual planting for best results.
You see, one day (say 5-10 days after initial planting) you'll notice the soil above your bean being pushed up like a miniature earth quake. This is a signal that you can use your finger to gently brush the top part of the soil away and check on your bean...
If he's not yet starting to 'green' then leave him as underground as possible. However, once the fledgling bean is green, the soil has be manually brushed away from the sides of the bean to ensure that dampness does not cause any mould to grow.

How will you grow your magic bean? Do you want to watch every tiny step of the growing process, or do you prefer to be surprised one morning when a message erupts from your pot like a volcano?
3. Keep moist but don't overwater
Are you tough? Can you handle the truth?
The truth is, if you over water your magic bean it's going to rot. And nobody likes rotten beans. Like literally nobody. So all you need to do is keep your soil moist, but not sodden or swampy.
This likely means spraying the soil lightly with water at most once a day. Putting your bean babies under the tap could well be the end of them (if you have an aggressive, maniacal tap like us anyway).
4. Give Your Beans a Bubble Bath
You know that wonderful feeling of having a hot soapy bubble bath after a long hard day in the office? Well magic beans love this too. Except rather than that luxury lavender and aloe vera bubble bath you picked up on special from Coles, they prefer... hydrogen peroxide.
Hydrogen peroxide is great for soaking any type of seed before planting. It helps provide the seed more oxygen, which will speed up germination and prevent infection from any mold or fungus that might be hanging around in your soil.
All you need to do is mix 6% hydrogen peroxide solution with equal part water (aim for a 3% solution) and let your beans soak in a little for around 30 minutes - but no longer than 4 hours. Then rinse and proceed to plant or sprout as normal.
This step is completely optional, but if you are a magic bean ninja in training then you'll find your little plump, white friends will genuinely enjoy that refreshing bubble bath soak.
5. Sprout your magic bean first before planting
This step is again optional, it's for those of us that just naturally don't have green fingers. Whatever we try, whatever we do, we somehow manage to quickly kill off any plant entrusted to us - without fail. So if this is you, and you're worried you might bestow the touch of death upon your magic beans, you can take the fail safe route and sprout them before planting.
All you need to do is pop your beans in a damp cloth (as in damp, but not sopping - squeeze out any excess) or flannel and cover with an upturned cup to keep them dark. In nature, beans obtain two things to sprout - water and darkness (yup it's dark under the ground).
Check them every few hours and provide some extra water to keep both them and the cloth moist.

After 1-3 (possibly more for some slow growers) days you will notice a small shoot grow out of the magic bean's eye. At this point, you should be able to remove the bean case by gently tugging and tearing at it.
Now your naked, sprouted bean is ready for planting! Just drop him, shoot downwards, into a little soil home, cover and water. There's no need to bury him completely. Make sure he gets some sunlight and in a few days he will start to green up.
6. Pull off the bean case as soon as you can
The bean's white case is like a little protective shell that is designed to keep the inner magic bean safe before it starts growing (seeds in the wild could hang around for months or years before they come into the necessary conditions for activation).
It will soon loosen within a few days of the bean being properly saturated with moisture.
While it will eventually wrinkle up and drop off by itself, don't be afraid to gently tug at the bean case to remove it by hand. This will help the beauty of your hand grown magic bean shine through as early as possible. You'd be looking to do this around 7-10 days after planting, not earlier.

Note that true bean ninjas also appreciate the beauty of the engraved bean case itself. If you remove the case early enough, you'll notice that the engraved design or message is truly intricate and beautiful. Keep the case and allow it to gently dry out.
If your bean is engraved with an emblem or logo, it will even 'pop out' to form it's own independent little bean-skin icon!
7. Make sure your babies get some sun
If you don't give your beans light, they aren't going grow. Simple.
Make sure to pay attention to the exact position and orientation of the home that you find to grow your magic beans in. A window sill is good but make sure that the light shines directly onto the beans and that the lip of your potting container is not shading your beans from getting their Vitamin D!
If you get worried, there's no harm is temporarily moving your bean pots outside into a sunnier position for a few hours (or even all day).
Beans love the sun, but don't forget if you live in a hot country, you may also need to water them multiple times per day to keep the soil moist. Hot sun can easily dry out soil in an hour or two.
8. Transplant as soon as the message falls off.
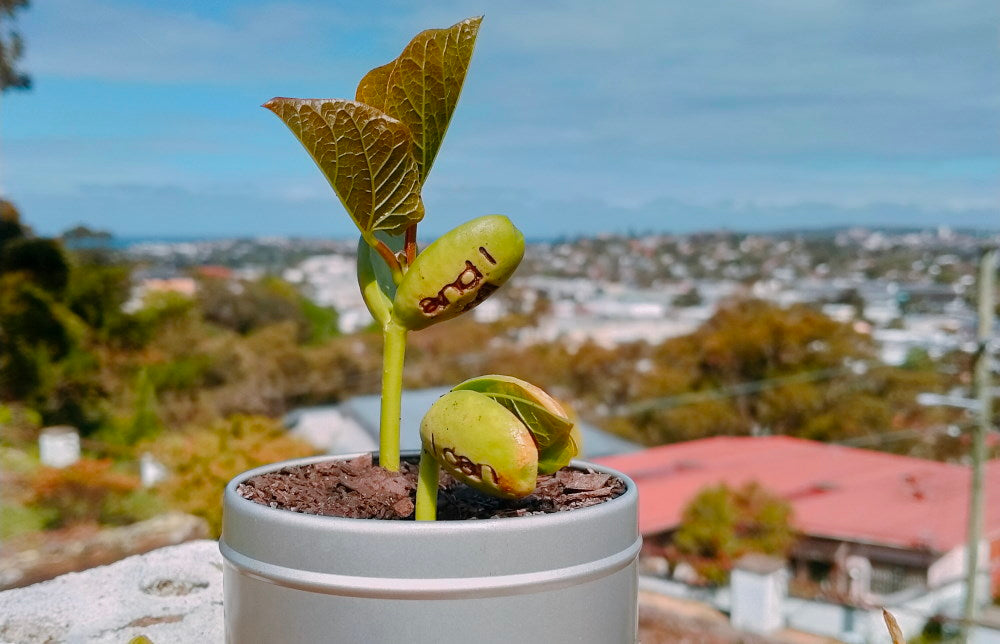
Once your magic beans sprout, you will notice that the stem and leaves start to grow from within the bean. These will slowly grow bigger and upwards day by day, until the side of the bean with your message is a smaller feature within the overall plant.
After around 4-6 weeks, the message will eventually fall off.
This is your cue to transplant your plant to a new, larger container (or your garden). If you continue to nurture it, it will eventually bless you with some wonderful purple flowers and a giant bean pod of its own - containing a sheaf of its own (unfortunately not engraved) magic beans. The circle of life is complete!
Final Thoughts
Well, we hope that you now feel enlightened as to how to grow a magic bean!
It's not a hard process. So just relax and enjoy, caring for your bean babies every day. Follow our tips, trust in nature and everything will turn out just fine.
BTW, if you read this far... why not check out our Personalised Magic Bean Set below?